How to Build Multi-Agent AI Apps in Databutton

In this tutorial, we will walk you through building multi-agent chatbots in Databutton using the Swarm Python package.
Swarm, developed by the OpenAI Solutions team, simplifies the process of managing multiple AI agents.
Think fewer large prompts, function calling, and less struggle.
An educational framework exploring ergonomic, lightweight multi-agent orchestration.
Learn more about Swarm here.
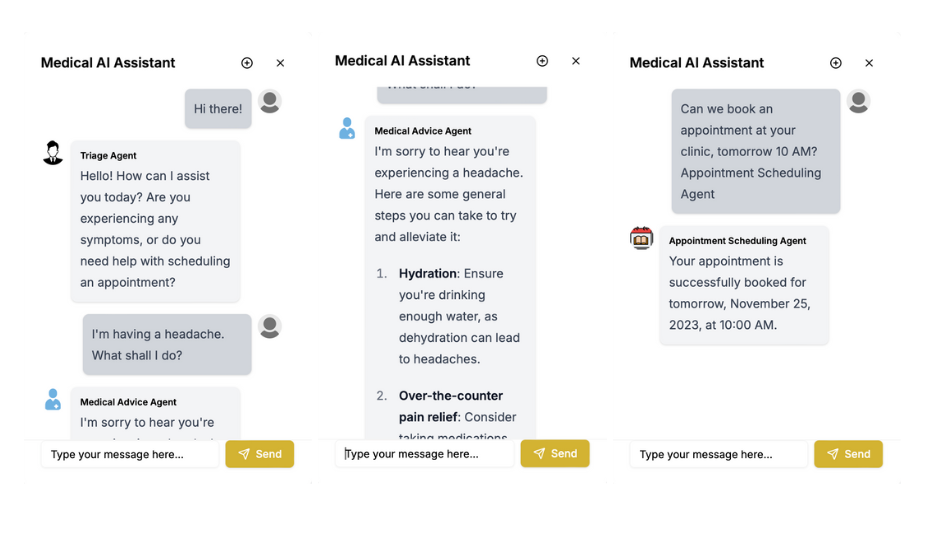
For this demo, we will create a Medical AI Assistant app. This assistant uses different agents, each focusing on a specific task:
- Triage Agent (the master agent): It identifies which specialised agent is best suited to assist the user.
- Medical Advice Agent: Provides recommendations related to general medical inquiries.
- Appointment Scheduling Agent: Manages appointment bookings with custom functions like Check Available Dates or Book Appointments.

Step-by-Step Guide: Creating a Multi-Agent Chatbot UI in Databutton with Swarm
To get started, let's build a simple frontend for your app.
- Create the UI Component
Begin by designing a simple user-friendly interface for your chatbot. Here’s an example prompt to create a basic UI component:
- Build a simple chatbot UI component where users can ask questions and an AI provides relevant responses.
- Place this chatbot in the bottom-right corner of the #Home Page.
Example prompt to build a basic UI component

- Building the Backend for Your Multi-Agent App
Now that the UI is ready, let’s build the backend for the app.
I would like to create a new backend called multi_agent.

This backend will use the latest Python package called Swarm.
Here's a link to a guide on using this package: [Add url or relevant code examples from this post].

Please research and adapt as needed.
Show me the implementation plan before starting to write the code.
Example Prompt for Setting Up the Backend
Code
# pip install git+https://github.com/openai/swarm.git

import os
from fastapi import APIRouter
from swarm import Swarm, Agent
import databutton as db
from pydantic import BaseModel, Field
from typing import List, Optional
import json
from json import JSONDecodeError
from datetime import datetime

router = APIRouter()

# Set the OPENAI_API_KEY environment variable
os.environ["OPENAI_API_KEY"] = db.secrets.get("OPENAI_API_KEY")

# Define the Swarm client
client = Swarm()

def get_appointments():
    try:
        return json.loads(db.storage.text.get("appointments"))
    except (JSONDecodeError, KeyError, FileNotFoundError):
        return {}

def save_appointments(appointments):
    db.storage.text.put("appointments", json.dumps(appointments))

def book_appointment(date: str, time: str) -> str:
    appointments = get_appointments()
    appointment_key = f"{date}_{time}"

    if appointment_key in appointments:
        return f"Sorry, the time slot for {date} at {time} is already booked."

    appointments[appointment_key] = {
        "date": date,
        "time": time,
        "booked_at": datetime.now().isoformat()
    }

    save_appointments(appointments)
    return f"Appointment booked successfully for {date} at {time}."

def agent_book_appointment(date: str, time: str) -> dict:
    result = book_appointment(date, time)
    success = "successfully" in result
    return {"result": result, "success": success, "date": date, "time": time}

triage_agent = Agent(
    name="Triage Agent",
    instructions="You are a healthcare triage agent. Help users describe their symptoms and determine which healthcare-related agent they should speak to (e.g., for medical advice or scheduling an appointment).",
)

medical_advice_agent = Agent(
    name="Medical Advice Agent",
    instructions="You are a medical professional. Provide general medical advice based on symptoms described.",
)

appointment_scheduling_agent = Agent(
    name="Appointment Scheduling Agent",
    instructions="You are an appointment scheduler. Help users schedule healthcare appointments. You can book appointments using the book_appointment function.",
    functions=[agent_book_appointment]
)

def transfer_to_medical_advice():
    return medical_advice_agent

def transfer_to_appointment_scheduling():
    return appointment_scheduling_agent

triage_agent.functions.extend([
    transfer_to_medical_advice,
    transfer_to_appointment_scheduling
])

class ProcessMessageRequest(BaseModel):
    message: str
    history: Optional[List[dict]] = None

class ProcessMessageResponse(BaseModel):
    messages: List[dict]
    updated_history: List[dict]
    agent_name: str = Field(..., description="The name of the agent that processed the message")

@router.post("/process_message")
def process_message(request: ProcessMessageRequest) -> ProcessMessageResponse:
    messages = request.history or []
    messages.append({"role": "user", "content": request.message})

    response = client.run(agent=triage_agent, messages=messages)

    updated_history = messages + response.messages

    return ProcessMessageResponse(
        messages=response.messages,
        updated_history=updated_history,
        agent_name=response.agent.name
    )
Backend code.
Understanding the Core Concepts of the Backend
- Instantiating and Running a Swarm Client: Start by defining and running your Swarm client, which will serve as the foundation for handling multiple agents.
# Defining the client
client = Swarm()

# Running the Swarm Client
client.run()
Defining Swarm Client And Running it.
- Defining an Agent: Let’s take the Triage Agent as an example:
triage_agent = Agent(
    name="Triage Agent",
    instructions="You are a healthcare triage agent. Help users describe their symptoms and determine which healthcare-related agent they should speak to (e.g., for medical advice or scheduling an appointment).",
)
Defining Agent in Swarm
The name and instructions fields are used here, but you can also configure fields like model, functions, and tool_choice. Read more here.
- Handoffs : An Agent can delegate tasks to another Agent using functions like this:
def transfer_to_appointment_scheduling():
    return appointment_scheduling_agent

triage_agent.functions.extend([

    # Other hand off functions
    transfer_to_appointment_scheduling
])
This allows the Triage Agent to pass users to the Appointment Scheduling Agent or other agents as needed.
- Integrating the Backend with Your Frontend
Now that your backend is set up, let’s connect it to the frontend.
Integrate the #multi_agent backend with the #ChatbotUI component.

Ensure that when the user clicks the send button, the backend is triggered, and the response is displayed back in the UI."
Example Prompt for Integration
This step links your multi-agent API with the user interface, creating a seamless interaction between the frontend and backend components.
Deploying Your App
In Databutton, deploying your app is as simple as a single click.
Want to see how to build multi-agent AI apps in Databutton? Check out this video tutorial on YouTube.
Follow us on X for the latest updates and join our Discord community to share your progress, ask questions, and collaborate 💜


